
Table of Contents
Getting Started with mAirList
This article will give you a quick overview of the mAirList Radio Automation (version 6.3) and will help you to get started with the software.
Working with the playlist
Add audio files
Before we can play audio items in the main players A and B, we must add files to the playlist. There are many ways to do this, e.g.:
- Drag audio files from Windows Explorer into the playlist
- Use the Insert button in the main toolbar
- Open a playlist file from the menu next to the Open button in the main toolbar
- Open a directory in the browser area (4), then drag items from the browser into the playlist
- …
The players are set to Auto Load mode by default, so as soon as you add files to the playlist, the players will load the topmost items automatically:
ASSIST mode
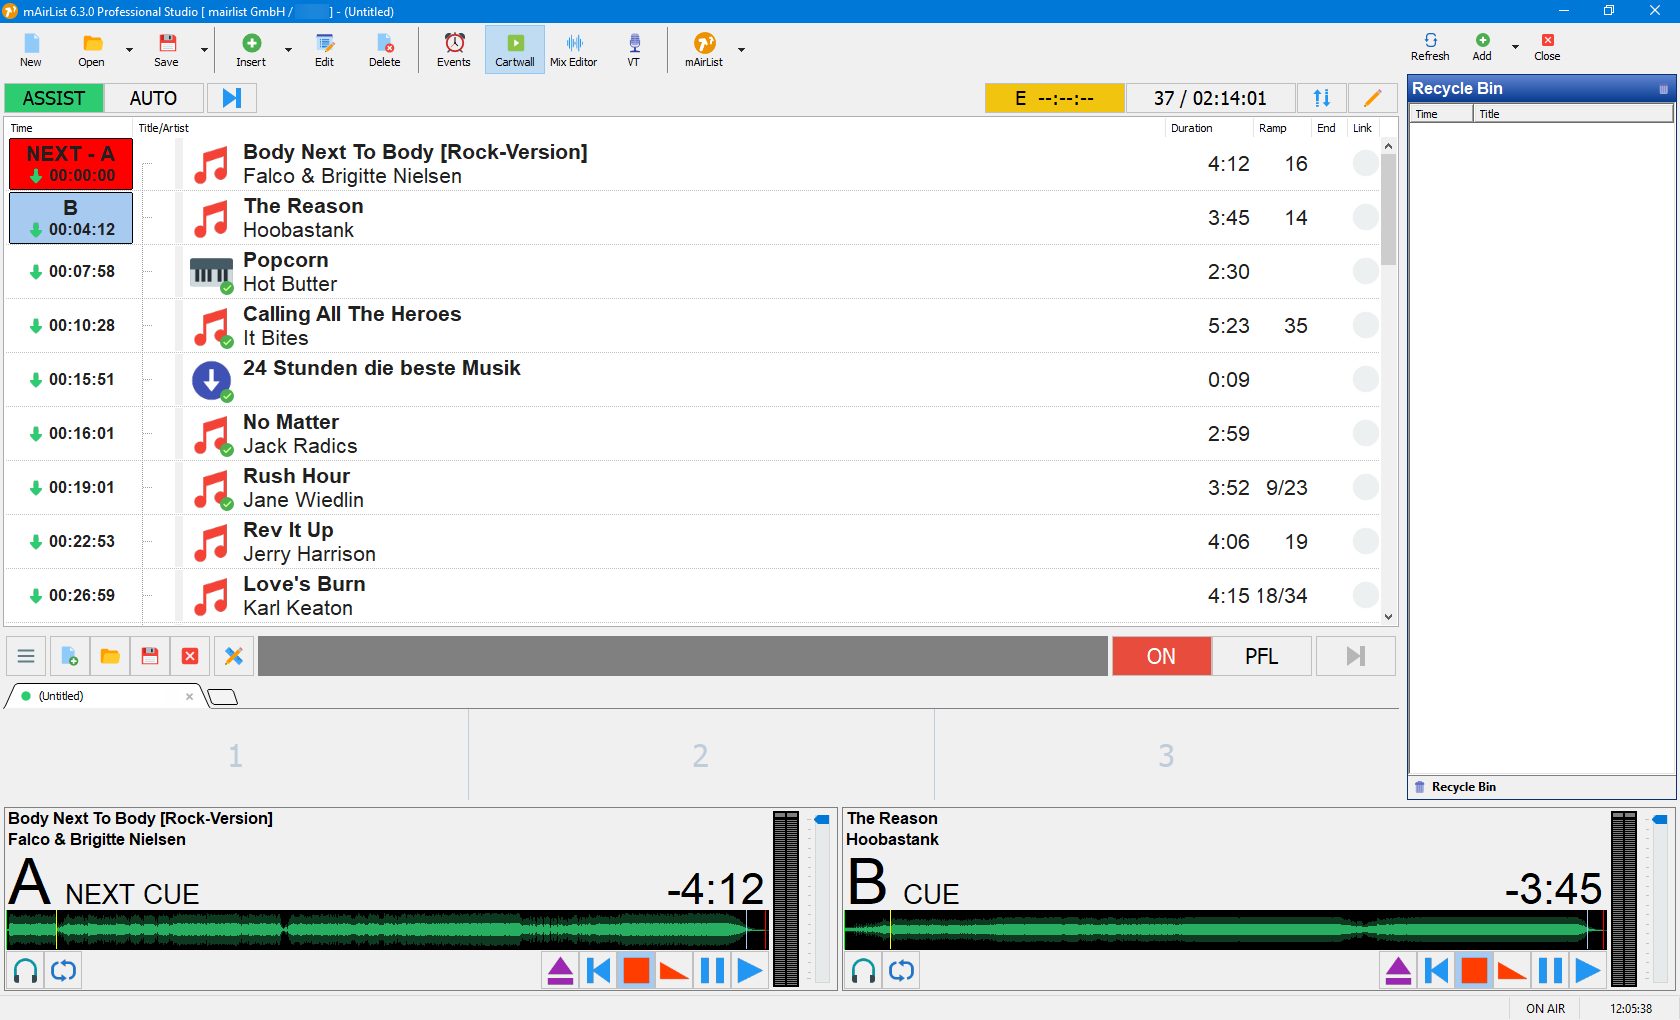
ASSIST mode, also called Live Assist, is the operation mode where a DJ is present and operating the studio manually. It's called live assist because you will find various features that will assist the DJ in this task, e.g. ramp/intro display etc. To start a player, just click the Play button:

Do you see the big red numbers? This is the ramp countdown, because the song happened to have cue points set already. You will learn how to do this using the Cue Editor later in this tutorial.
Wait for the first song to finish, or click the Fade Out or Stop button, then start player B:
Notice that the first song is automatically removed from the playlist and moved to the Recycle Bin browser on the right. This behavior can be adjusted in the config later.
Starting and stopping the player is usually not something you would do with the mouse in a real studio. Instead, mAirList offers various remote control options. We'll discuss the basics of remote control later in this tutorial.
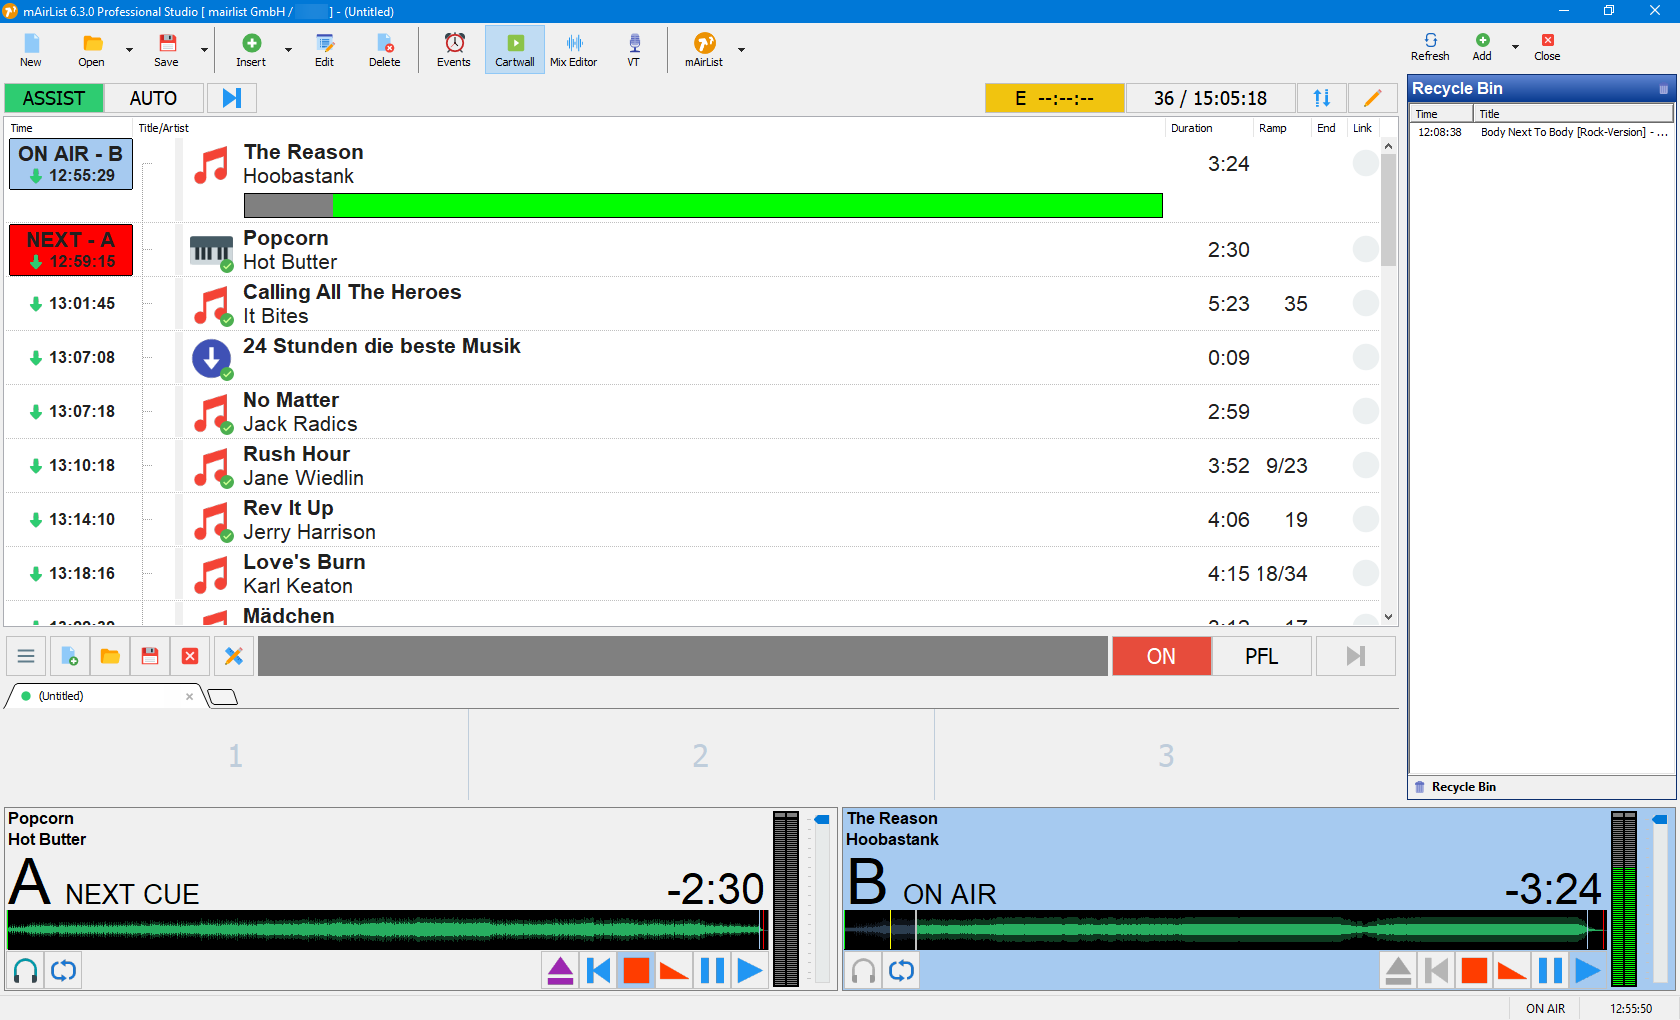
AUTO mode
By clicking the red AUTO button in the toolbar above the playlist, you engage automation mode. While in automation mode, mAirList will start and stop the players automatically, playing the items in the playlist one by one.

You can toggle between AUTO and ASSIST mode at any time by clicking the buttons in the toolbar. Depending on the configuration, mAirList will either use the players A and B in turn, or play all songs through a single player (either player A, or the one that was active by the time you switched into AUTO mode), while still handling fades correctly. The latter mode is very convenient when you use multiple channels on your mixing console, because you do not have to open or close faders when toggling AUTO/ASSIST mode.
Fades and Auto Cue
Unlike primitive “jukebox” software, mAirList does not have a fixed crossfade setting that will fade out all songs x seconds before the end. That's because we believe that in professional radio, every song requires and deserves a distinct fade point. So instead of a fixed crossfade time, mAirList uses the Fade Out (and possibly Start Next) cue markers set for the song in the Cue Editor to determine the point where the next auto item should be started.
Setting a proper Fade Out point for all songs in your library is an important but also time-consuming task. mAirList's Auto Cue feature will help you by making a guess based on the audio level whenever you add a new song to your playlist or database library (also for the Cue In and Cue Out markers that cut off any silence and the beginning and end of the song, respectively). This will lead to a fair result in most cases, but you can still adjust the Fade Out marker manually when required. If you feel that Auto Cue is setting the markers incorrectly all the time, you may also adjust the Auto Cue level thresholds in the config.
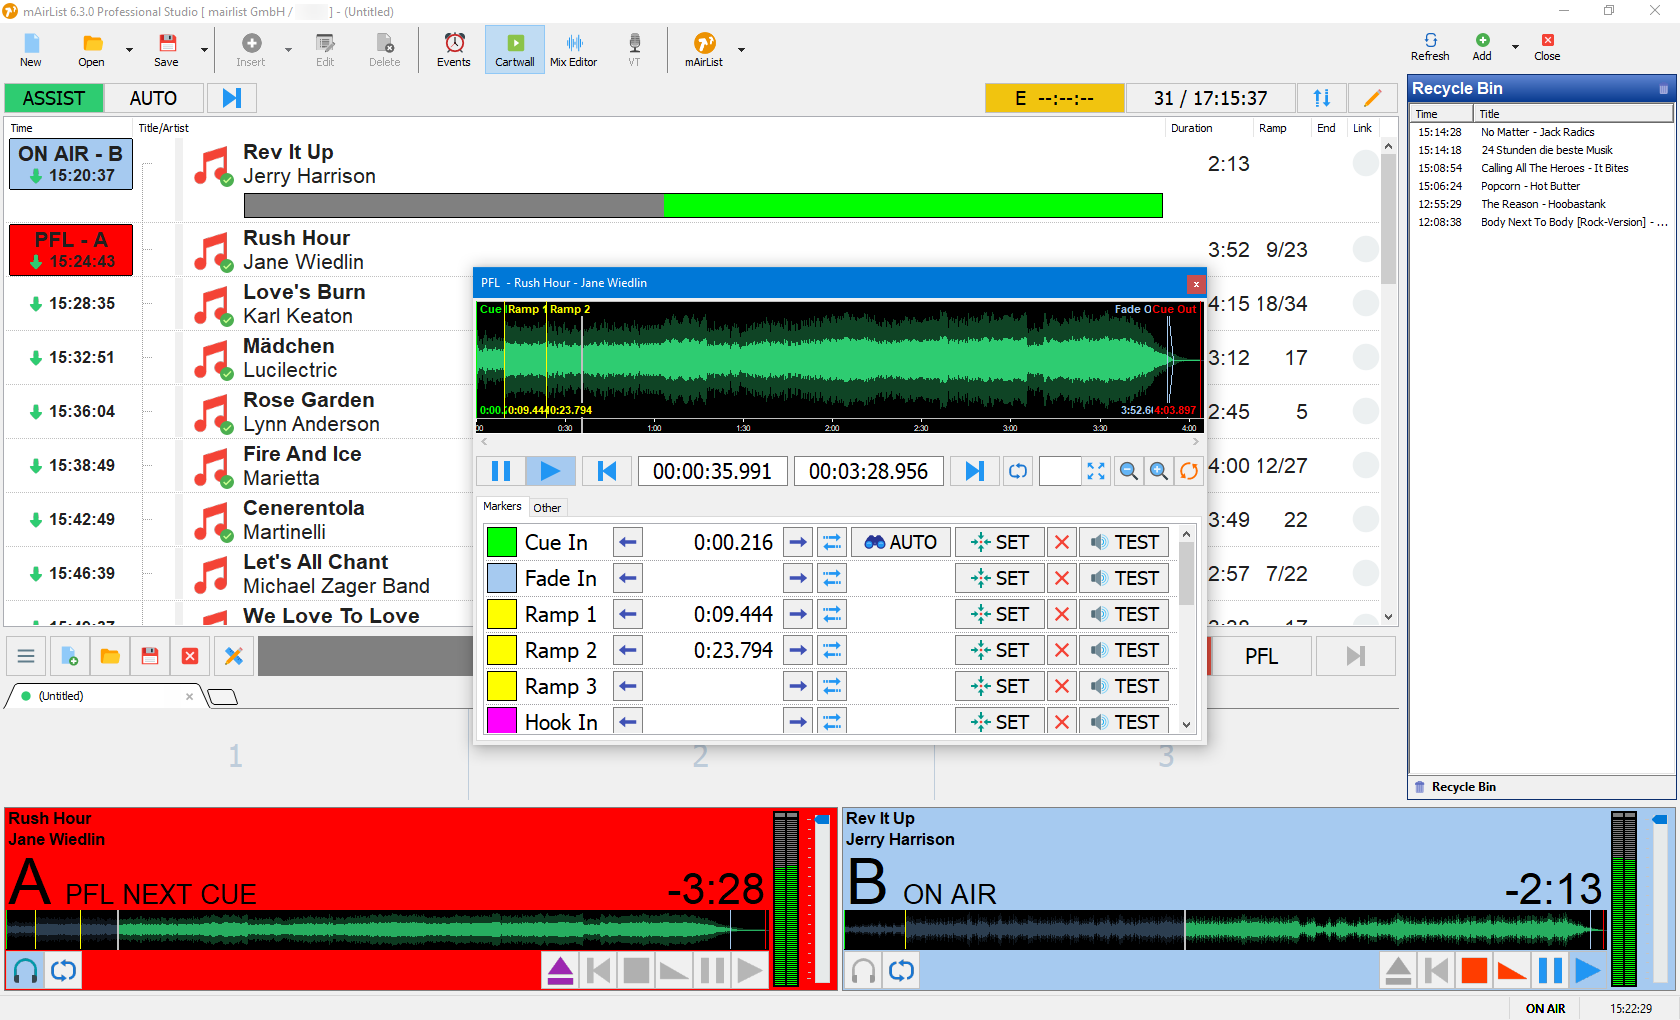
Prelistening (PFL) and the Cue Editor
The playlist offers two basic ways of prelistening (or “PFL'ing”) to a song before playing it on air, and possibly adjusting its cue markers.
The first method is to double-click an item in the playlist to bring up its Properties dialog, and then switch to the Cue Editor tab. As a shortcut, right-click the item and choose PFL from the popup menu, this will open the Properties dialog, switch to the PFL tab and start playback right away:
The second method can be used for items that are already loaded into an (idle) player. Just click the small “headphone” button in the player - it will start playing in PFL mode and also bring up the Cue Editor window:
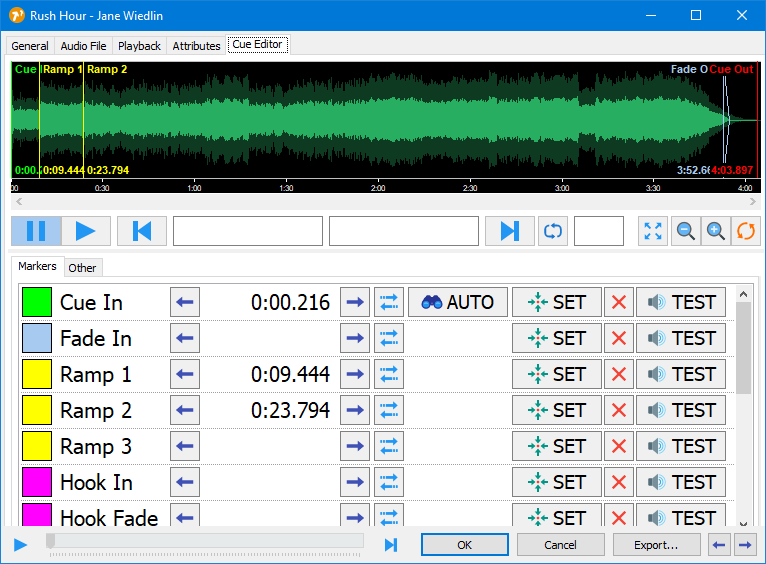
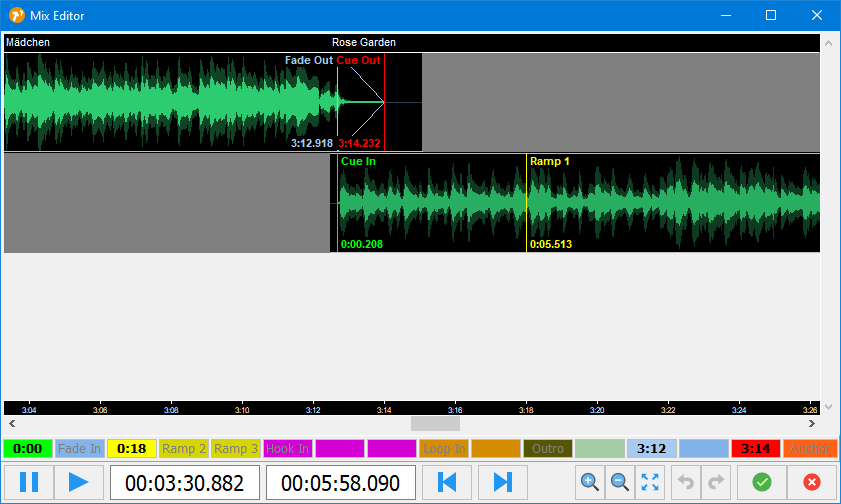
In the upper part of the Cue Editor, the audio waveform of the item is displayed. It is generated in realtime, so it may take a few seconds before it is displayed, depending on the file size. Use the mouse buttons and mouse wheel to navigate or zoom into the waveform.
The buttons below the waveform are used to start/stop playback, engage the END MON function (which will play the last 10 seconds of the item), or zoom the waveform if you decide not to use the mouse wheel for that.
And then there is the list of cue markers:
- Cue In: The point where playback starts, typically used to cut off any silence at the beginning of the track; will be set by Auto Cue for any new track.
- Fade In: The point where the full volume is reached, so you get a fade from Cue In to Fade In. Very rarely used in radio, left empty most of the time.
- Ramp 1/2/3: Also called “intro”, the point where the vocals start, or another significant change in the build-up of the song takes place. When you set this, you will get a nice coutdown and progress bars during playback.
- Hook In/Fade/Out: The section of the song used for hook promos.
- Loop In/Loop Out: The section of the item used when playing in Loop mode. Can be used for music beds etc., very useful when playing through the Cartwall.
- Outro: The opposite of Ramp, the point where the vocals end. The progress bar will turn into a different color at this point.
- Start Next: The point where the next song is to be started in AUTO mode. When left empty, the next song will start at Fade Out, Cue Out or EOF.
- Fade Out: The point where the song is to be faded out in AUTO mode. Will also start the next song unless a specific Start Next marker is set. This point is set automatically by the Auto Cue function and can be adjusted manually.
- Fade End: Can be used together with Fade Out to fine-tune the duration of the fade.
- Cue Out: Where playback stops. Just like Cue In it's used to cut off silence, and set by Auto Cue.
- Anchor: A special point that facilitates backtiming calculations when using Fixed Times (not part of this tutorial). When this marker is set, all timing calculations will refer to this point rather than the beginning (or Cue In) of the item.
Operations on cue markers can be made using the buttons in the table, or straight within the waveform display:
- To set a cue marker, click the SET button during PFL playback, or drag it with the mouse from the list into the waveform.
- To adjust the position of a marker, click the arrow buttons, or move it with the mouse in the waveform display.
- To delete a marker, click the X button, or use the mouse to drag it out of the waveform.
- To prelisten to a marker (start playback from the associated position), use the TEST button, or double-click the marker in the waveform.
- To re-engage the Auto Cue function, reverting any manual changes, click the AUTO button. This is only available for Cue In, Fade Out and Cue Out.
Note that cue markers are not permanently preserved unless you export them to the file tag, MMD file, or a database. See the section on storing metadata below.
Mix Editor
The Mix Editor is another way to edit the cue markers of one or more items. It is some sort of multi-track cue editor. You can open it in various ways, the easiest is to select two or more items with the mouse (hold down Shift), and then click the Mix Editor button in the toolbar.
Setting and adjusting cue markers in the Mix Editor works pretty much like the Cue Editor, just drag them around with the mouse (to set a new marker, drag it from the respective button at the lower edge of the dialog into the waveform). You can also drag the entire waveform with the mouse in order to adjust the Start Next marker of the preceding items. The Mix Editor has a built-in prelisten function, and changes you make are reflected in the audio output instantly.
Editing metadata
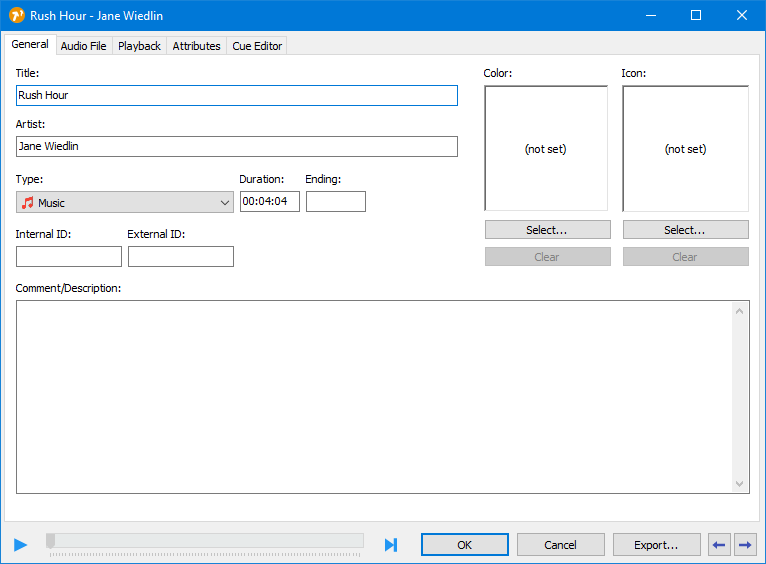
When you explore the other tabs of the Properties dialog, you will find that there are many other things you can edit here. The most important tab would be the General tab which allows editing of the basic metadata fields like artist, title etc.:
Another important tab is the Attributes tab. In mAirList, “attributes” are simply name/value pairs that are used to store any kind of metadata for a song. When you add a new audio file that has a supported file tag (e.g. ID3 for MP3 files), mAirList will import the existing file tags (e.g. album name, genre, year) as attributes.
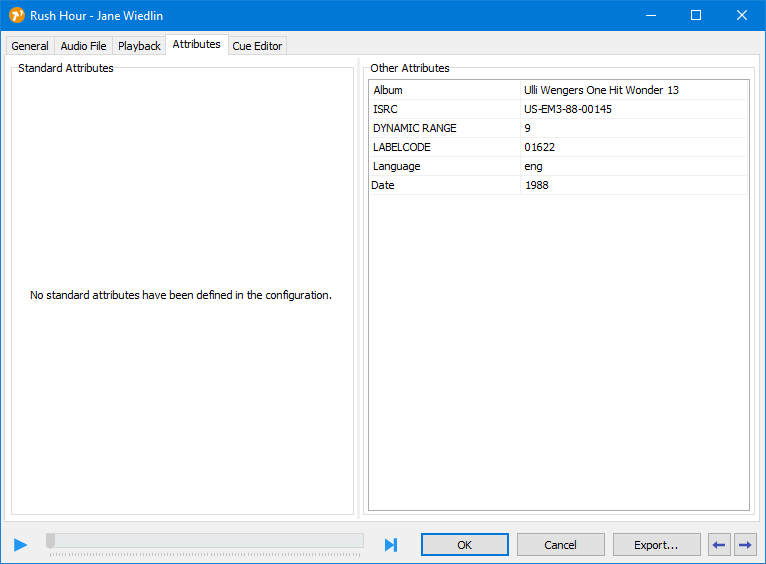
By default, attribute values are displayed in the Other Attributes section on the right-hand side of the dialog, in a sample table. Use the cursor-down key to add more rows to the table. If there are any attributes that you use frequently, you can define them as “Standard Attributes” in the configuration, and you will get a much nicer input form on the left-hand side of the dialog.
Storing metadata
Any changes you make in the Properties dialog, including cue markers and attributes, will be “volatile”, that means, they are only stored in RAM for the instance of the audio item in the current playlist, and will be lost when you delete the item from the playlist.
To make your metadata changes permanent, mAirList offers three ways of exporting the metadata, found in the menu that appears when you click the Export… button at the bottom of the Properties dialog:
- File tag: Metadata is stored in an XML block in a hidden part of the ID3v2 tag.
 Only works for MP3 files, and not of the file is currently loaded into a player (the file will be locked on disk then).
 - MMD file: Metadata is stored in a small XML file (file extension
.mmd, “mAirList meta data”) alongside the audio file. Works with any file type and is non-obstrusive (original file remains untouched). - Database: Stores the metadata in the database library. Requires a mAirListDB to be set up first.
When you re-add the same file to the playlist or cartwall later, mAirList will detect the existing metadata and use it.