Table of Contents
Streaming Encoder
mAirList has a built-in encoder that can be used to stream audio over the Internet. Features include:
- Compatible with Icecast, Shoutcast v1, Shoutcast v2
- Any number of simulatenous connections with custom audio formats
- Local records (save stream to file)
- Mic, Line and Aux input for streaming live audio
- Direct streaming of player output without physical sound card
- Built-in soundprocessing (DSP) and support for external VST or Winamp plugins
- Regionalization-aware: Regional content can be routed freely among the configured server connections
How it Works
You can think of the streaming encoder as a small mixer with a number of inputs:
- Player input
- Secondary player input
- High-priority player input
- Line input
- Mic input
- Aux input
The “Player” inputs receive the signal of all players which have their output device set to the “Encoder” (or “Encoder - Secondary Input” or “Encoder - High Priority Input”) in the Audio Devices configuration. Generally the primary input (“Encoder”) should be used. The secondary input can be used to apply a different set of DSP plugins to selected players. The “high priority” input will mute all other inputs as soon as a player is sending audio to it. This is used for the Stream Monitor.
The “Line”, “Mic” and “Aux” inputs record audio from any soundcard. You can select the associated soundcard input on the Audio Devices configuration page.
The encoder combines thes signals into a master signal and sends it to the Icecast/Shoutcast servers. Additionally, the master signal is sent to the “Encoder Playback” audio device set up in the configuration if you want to listen to it locally.
At various stages, DSP effects and external soundprocessing plugins can be applied.
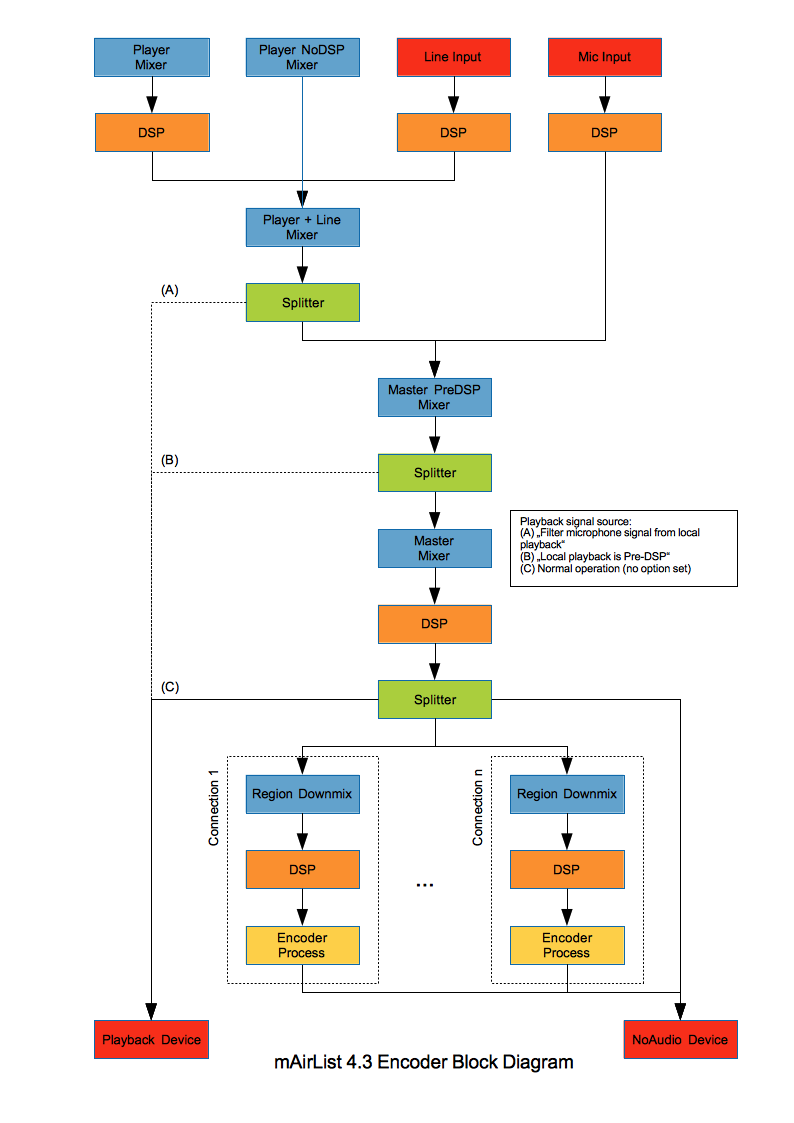
This is visualized by the following diagram:
Note: Diagram is outdated and does not reflect all audio routing introduced since v4.3.
Encoder Status Screen Object
To manage the encoder connections, see audio levels etc. during runtime, you must add the Encoder Status screen object to the mAirList playout window:
To add the window, open the configuration app, go to GUI → Screen Objects, click Add and then Encoder Status.
The status window contains the following elements:
- A MIC button to enable/disable the Mic input
- A LINE button to enable/disable the Line input
- The status indicator (offline/connecting/connected/number of listeners) - double-clicking this label will also bring you directly to the encoder configuration in the mAirList Control Panel
- The Connect/Disconnect button
- Audio levels (usually two bars for a stereo signal - in the above screenshot, regionalization with two extra regions is active, so it is six bars in total)
Audio Routing
Audio can be routed freely to and from the encoder, but there are two common setups described here: Internal audio routing (no mixing console used) and external audio routing (recording master signal from external mixer).
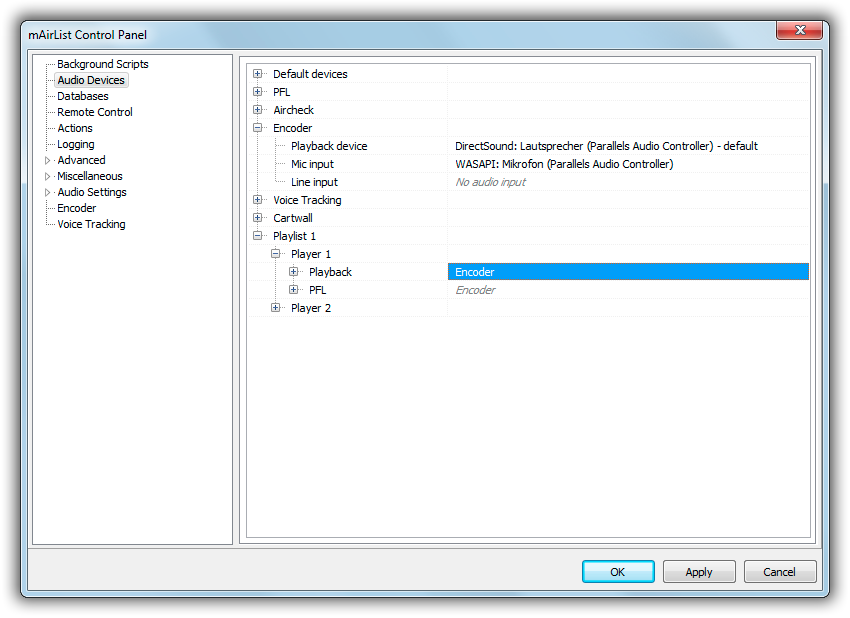
All audio settings described here refer to the Audio Devices page in the configuration app or mAirList Control Panel:
Internal Audio Routing
In this setup, the audio of all players is routed directly into the encoder, so it stays “inside” mAirList rather than being sent to a soundcard. Optionally, you can listen to the encoder master signal on any soundcard. You can also use the MIC button to toggle the microphone input when you want to make an announcement.
Internal audio routing can also be used on server hardware with no physical soundcard. All audio stays inside the application, no virtual soundcard etc. is required.
Steps to follow:
- Set the Playback device for all players (Playlist 1 → Player 1 etc.) and the cartwall to “Encoder”
- Optionally, as a precaution: Set the PFL device for all players and the cartwall to any other soundcard or “no audio output” so that it won't be broadcasted on your stream.
- Optionally: Set Encoder → Mic input to the soundcard input where your microphone is connected
- Optionally: Set Encoder → Playback device to the soundcard on which you would like to listen to your broadcast
During your broadcast, use the MIC button to turn your microphone on and off. Note that, due to the nature of digital audio on computers, there will most likely be a delay between what you speak and what you hear on the playback soundcard. With good audio cards and ASIO or WASAPI, the delay can be minimized to a level that you don't really notice. Alternatively, turn off Filter microphone signal from local playback in the encoder options so that you don't hear yourself at all.
The LINE button is not used in this setup, you can disable it in the encoder status screen object settings in the configuration app.
External Audio Routing
This setup is for people who own a physical mixing console and use that console to mix the on air signal rather than using the encoder built-in mixer. In essence, you connect all audio sources (mAirList players and cartwall, microphones, CD players, etc.) to your mixing console, and then send the master signal back to your PC via Line In.
Steps to follow:
- Set the Playback device for the players (Playlist 1 → Player 1 etc.) and the cartwall to the soundcard output that is connected to the respective channels on your mixing console
- Set Encoder → Line input to the soundcard input where your the master signal from your console is connected
- Important: Set Encoder → Playback device to “No audio output”. If you don't, the encoder master signal is sent back to the soundcard, and there is a good chance that it will loop through your console, causing feedbacks and echoes.
Now when you start mAirList, click the LINE button in the encoder status window to enable recording from the Line input. (Note: To automate this step, go to Actions in the configuration app, select After startup in the list at the top, and add a new action of type Encoder → Enable line input.)
The MIC button is not used in this setup, you can disable it in the encoder status screen object settings in the configuration app.
Server Connections
Server connections can be set up in the Encoder page in the configuration app or mAirList Control Panel. From the main window, double click the status label (“connected”, “disconnected”) and you will be taken directly to the right place.
mAirList supports multiple encoder connections at the same time, in different formats. To add a new connection, click Add and select the desired type. You can enable/disable connections at runtime using the small checkboxes in the connection list.
In the following section we'll look at the different connection types and their parameters.
Shoutcast, Icecast
These two connection types are for streaming connections to a Shoutcast (v1 or v2) or Icecast (v2) server, the most commonly used type of streaming servers on the Internet. The setup for Icecast and Shoutcast is almost the same.
Server
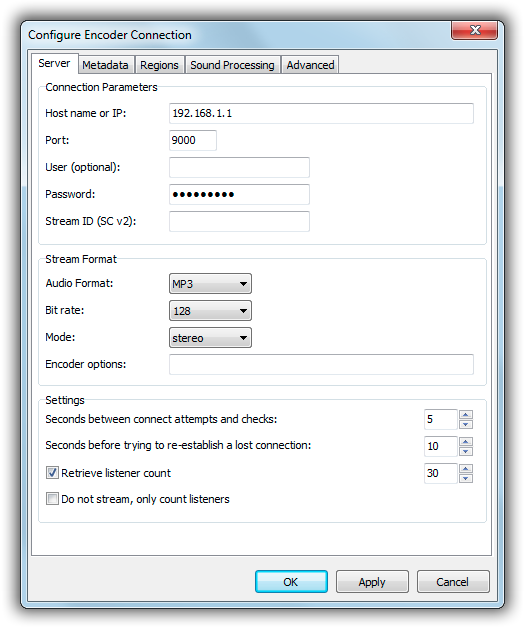
On this tab, enter the Host name or IP and port of the server and your password - your streaming server provider will give you the required information. The user name is only used for Icecast in some special cases, most of the time it can be left blank. For Icecast servers, you must also specify the mount point. For Shoutcast v2 servers, enter the Stream ID.
In the stream format section, specify the audio format, bitrate and stereo/mono mode of your stream. The encoder options you enter here will be passed to the command line encoder (lame.exe, oggenc.exe, opusenc.exe) as additional parameters, they will allow you to fine-tune the audio settings according to the documentation of the respective encoder.
The supported audio formats depend on the type of server. For Shoutcast, only MP3 is supported. For Icecast, MP3, Ogg Vorbis and Opus are supported. If you want to stream in a different format not listed here, you can set the format to Custom and enter the MIME type in the text field that appears. Also enter the full path and parameters of the command line encoder to use in the Encoder options box. The command line encoder must be set up to recevice raw PCM data via STDIN, and return encoded data via STDOUT.
In the Settings section, you can fine-tune the interval between connection attempts, reconnection attempts and listener count queries. It's also possible to skip the entire streaming and only count listers - useful when you have a bunch of transcoding servers and want to query their listeners count to be displayed in the Encoder Status window.
Metadata
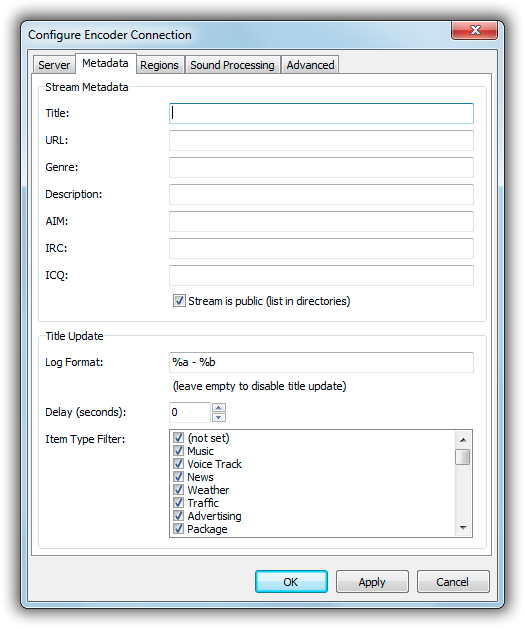
The Stream Metadata is the basic metadata of the stream like title, genre, URL, etc. - this is what's displayed in the public stream directories if you choose to appear there.
In the Title Update section, you can choose how mAirList displays the title of the current song in the stream. Use any of the usual logging variables. You can also specify a delay before the song is updated (useful to account for delays in the audio), and a filter so that e.g. only music is displayed but no jingles.
Regions
Here you can select which region signals should be sent to this particular connection. Please see the notes on Regionalization below.
Sound Processing
Connection-specific sound processing can be set up here. Please see the section on sound processing below.
Advanced
If you want to give the connection a different name in the connection list (default is the host and port), enter the custom caption here.
Integrated Streaming Server
The integrated streaming server is a Shoutcast compatible server which is built right into mAirList, so the listeners (audio players) can connect directly to mAirList rather than using a Shoutcast/Icecast server as a relay.
Note that the integrated server doesn't have as many options as a full-featured Shoutcast or Icecast, and is also not able to handle a lot of listeners. So this feature is rather meant for applications with a small number of clients, e.g. inhouse streaming.
Record to File
This is a virtual connection type that allows you to save the streamed audio into a (compressed) audio file rather than sending it to a server.
The output folder and file format can be adjust freely, using logging variables for the current date/time. You can also create a new file every x minutes, which is useful if you want to build a continous archive of your streamed broadcasts.
Additional Local Audio Output
Using this virtual connection type, you can route the master signal (and any regional submix thereof) to an available soundcard. This is useful if you want to listen to a particular region rather than the entire master signal.
Sound Processing (DSP)
mAirList allows the integration of internal or external (VST, Winamp, Stereo Tool) DSP plugins into the encoder signal. The DSPs can be applied at various stages of the signal flow (see the block diagram above):
- Master sum
- Any of the inputs
- Signal of any particular server connection
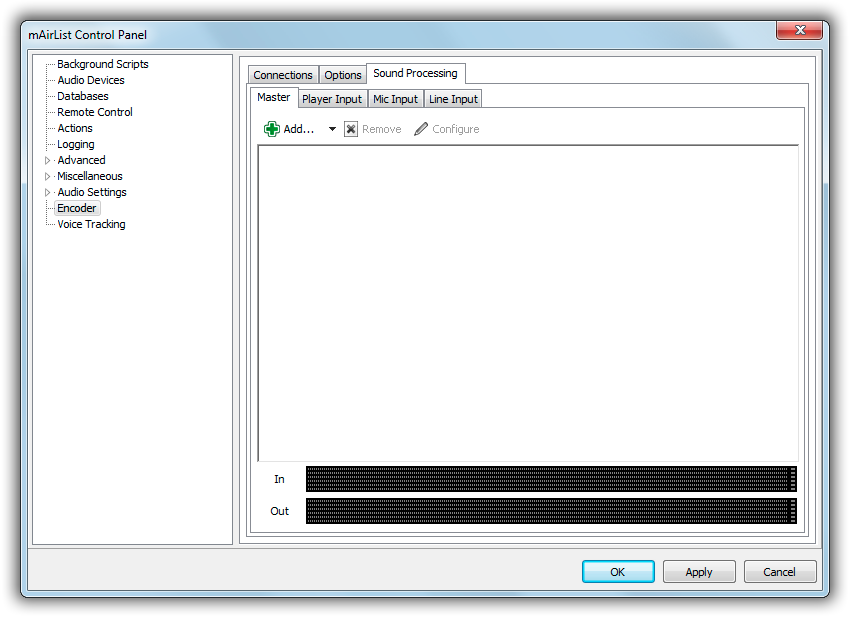
The connection-based DSP chains are managed in the connection properties dialog, the other chains on the Encoder configuration page, Sound Processing tab.
Use the Add button to add a new effect to the DSP chain and set up its parameters. When you have multiple effects in the list, you can reposition them by dragging them with the mouse.
Regionalization
The encoder has built in support for Region Playout (Regionalization). See setup instructions here.

