Table of Contents
Getting Started with mAirListDB
This article is an introduction to the mAirList audio and scheduling database, mAirListDB, and will help you to make the first steps with mAirListDB
About mAirListDB
mAirListDB (mAirList Database) is the audio and scheduling database built into mAirList. It is made up of three parts:
- Audio Library - keeps a list of your audio files, lets you edit their metadata and organize the audio items in a virtual folder structure.
- Playlist Editor - a place where you can create and edit hourly playlists that are later grabbed by the playout application.
- Mini Scheduler - a music scheduling function built into mAirListDB that allows you to generate hourly playlists based on configurable hour and music templates, or import music from 3rd party schedulers.
mAirListDB is built into mAirList (except Home Player), so you don't have to install any other software. It's designed as an add-on for mAirList though, so mAirList can operate without any database backend, and even when you have a mAirListDB set up, you can still play audio files straight from any Windows folder without adding them to the mAirListDB library or playlist first.
SQL database
mAirListDB uses an SQL backend to store the library and playlists. There are two kinds of backends available:
- Local database: All data is stored in a single
*.mldbfile on your local harddisk, using an “embedded” SQL database called SQLite. The setup is very easy because SQLite is built into mAirList, and you don't have to worry about an SQL server installation. However SQLite will not work well over a network, so this type of installation is only recommended if you use mAirList on a single, standalone computer. - Networked database: Uses a regular SQL Server, either PostgreSQL (recommended), MySQL or Microsoft SQL Server. Setup is more difficult because you have to install the SQL server first, but the network capabilities of these SQL products will allow you to access the database from any number of mAirList computers on your LAN simultaneously.
Note that the SQL database only stores the metadata of the audio items in your library, not the actual audio files - the files will be located in a regular harddisk folder or network share.
Audio folders
Unlike other radio automation products, mAirListDB does not organize your audio files in a cryptic folder structure, or reencodes them to any particular audio format. Instead it works on existing audio folders located on your harddisk or a network share. (Future versions might support additional storage locations such as HTTP servers or cloud services - that's why we use the general term “storage” to refer to your audio folders.)
How mAirListDB handles your audio files
Once registered as a storage, mAirListDB can synchronize your audio folder: It scans the folder recursively and creates a new data record in its library for all files found. (If you deleted any files since the last sync, it can also delete the data records for that files in the same step.)
Unless explicitly requested, mAirlistDB will never perform any write operations on your audio folders (delete, change or copy files). It tries to be as unobtrusive as it gets - it just scans (“synchronizes”) the folders and adds a list of the files to its library, where you can start editing metadata and organize the files in virtual folders.
mAirListDB also doesn't care about the format your file are in. When it scans the folder, it will find all audio files supported by the BASS audio library and any installed BASS add-on. Mixed content is no problem at all. File tags (like ID3 tags) are automatically imported when possible.
So when you're migrating from another radio automation software to mAirList, you can usually just add the existing audio folder as a mAirListDB storage and use it. This makes the migration very easy. (In fact it should be possible to use both products at the same time.) For some third-party automation software, we have also import filters available that import the existing metadata from the third-party database once the files have been sync'd into mAirListDB.
Recommended folder layout for new libraries
If you plan to start a brand new audio library, we recommend that you set up a network share, say M:\ (UNC paths like \\server\audio will also work), and create directories for music, jingles and other content:
M:\Music
M:\Jingles
M:\News
...
(For a local mode mAirListDB installation, you could create a directory C:\Audio and then use subdirectories like C:\Audio\Music etc. instead.)
Each of these directories will then be registered as a storage in mAirListDB and can synchronized with the Library. Inside the directories, you can organize the files however you like, e.g. create a subdirectories for each artist in the Music directory. mAirListDB will recursively scan each storage during the synchronization process, so it will find the files in any subdirectory further down the tree.
However it is very important that you do not rename or move the files around once they have been added to the Library, otherwise the file will show up as missing (under the old name) and new (with the new name) at the same time. (Note: The Sync dialog has a Fix renamed files function to handle this situation, but generally all files should stay in their location and keep their names all the time.)
Setup
As mAirListDB is an optional add-on for any mAirList installation, you must set up the database before you can start using it.
SQL setup
First of all, you must install and prepare the SQL datatabase (or SQLite database file for local mode), and add the database connection to your mAirList configuration. Please see the instructions for the particular SQL backend you are going to use:
Once the SQL backend is set up, and the database connection has been added to mAirList, you will be able to run the Database application from the mAirList group in the Windows Start Menu, and the mAirListDB main window will open. (Alternatively, click the green Database button in the toolbar of the playout window to open the mAirListDB window from inside the main app, it will serve the same purpose in most cases.)
Prepare audio folders
Next, you must decide where to store your audio files (local harddisk and network share), and which folders to use as storages for the mAirListDB Library. Please see the comments on audio folders above. The audio folders should also be populated with a couple of audio files so we can try the synchronization function.
Add audio folders as storages
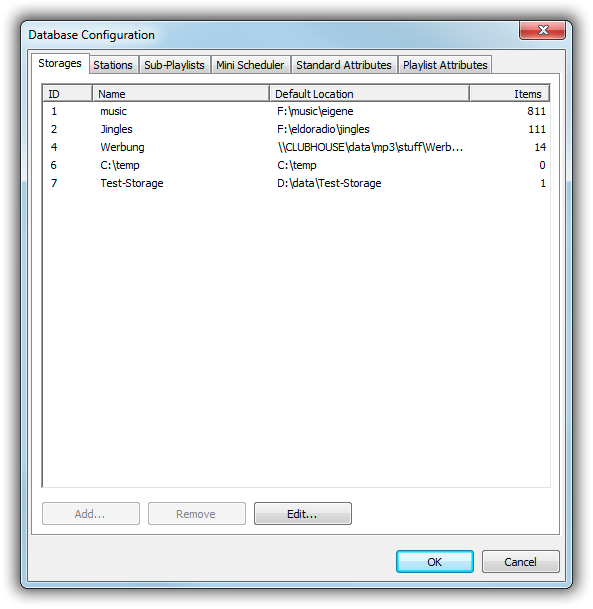
Open the mAirListDB app and and go to Administration → Configuration → Storages and add your audio folder(s) as storages.
Do not add individual subfolders of another storage! mAirListDB will automatically scan all subfolders!
You will be able to enter a name and description for each storage that will later appear in the menus - by default, the name is just the folder name.
When you're done, click OK - you will be prompted to restart mAirListDB.
Synchronize storages
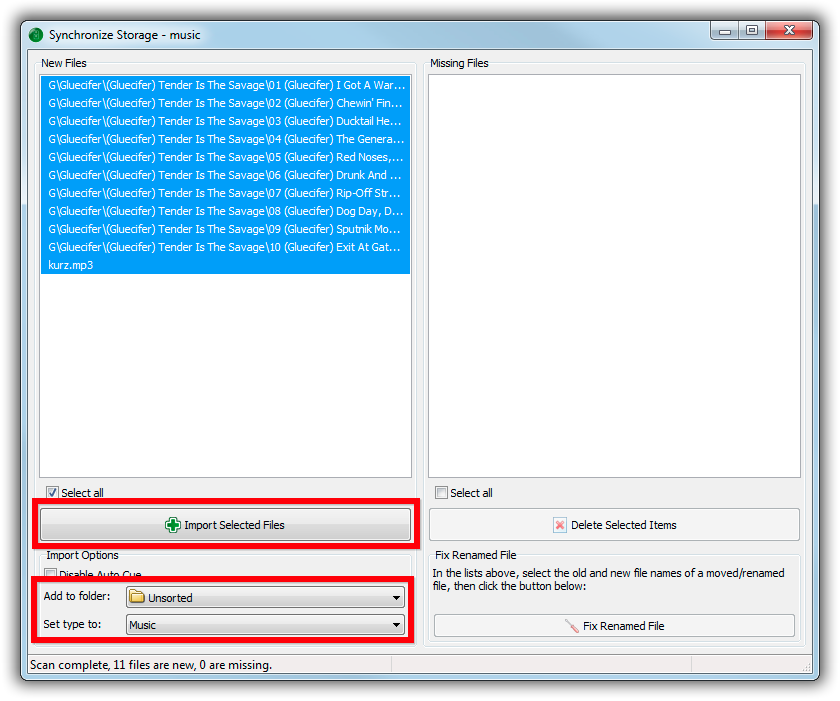
Now we are ready to scan your hard drive (the registered storages) for audio files. Click the Synchronize button, select the desired storage (if you have registered more than one), and the Synchronize dialog will appear:
When the scan is complete, the list of new files (not yet part of the Library) is displayed on the left hand side. By default, all new items are selected, but if you don't want to import everything at this time, you can select individual items or a range of items with the mouse (hold down Ctrl or Shift and click).
It's a good idea to set the type of these files to “Music” (or whatever it is) at this point, in the Import Options section. You can also specify the virtual folder that the items should go into - as we haven't set up any folders yet, it's simply the Unsorted folder.
When ready, click Import Selected Files, and mAirListDB will open each file, analyze it (read tags, perform Auto Cue etc.), and add it to the Library.
When you add more files to your audio folder, you can return to the Synchronize dialog at any time and repeat the steps. If you happened to delete files, they will appear in the right-hand side list, and you have the option to remove them from the Library.
What's Next?
Once you have added your audio files to the library, you can start setting up the scheduler: Music Scheduling with mAirListDB

