Table of Contents
MusicMaster and mAirListDB Synchronization via Files
This tutorial explains how to set up synchronization between mAirListDB and MusicMaster via files. This is the traditional approach using text files for the three syncronization tasks:
Prerequisites
We assume that you have the following available and set up:
- mAirListDB, with audio items in the library, and Hour Templates set up. (You can create Music Templates that use the internal scheduler for testing, and then switch to MusicMaster import.)
- MusicMaster (an edition that supports library sync and schedule export)
MusicMaster requires that you use a fixed set of folders (and possibly file names) for the synchronization tasks. In our example, we use the following three folders:
C:\MM_Sync\LibraryC:\MM_Sync\ScheduleC:\MM_Sync\Reconciliation
Please create these folders before you continue with this tutorial.
Library Synchronization
This section is about library synchronization, e.g. automatically adding songs from mAirListDB to MusicMaster. (We assume that you add all songs in mAirListDB first, then use this synchronization method in order to add them to MusicMaster.)
Export from mAirListDB
The first step is to export the mAirListDB library, or part of it, as a CSV file.
To create the file, use one of the commands in the mAirListDB app main menu under Database → Export. You can export the entire library, only the current view (folder, item type filter, etc.), or the current selection.
We use the mAirListDB Library CSV Import/Export format, so make sure that you choose “CSV file” as the file type. (There are other formats that use the .csv extensions as well, but “CSV file” is the correct one, should be at the top of the list.)
MusicMaster requires that you use a fixed name for the CSV file. In our example, we use C:\MM_Sync\Library\LibraryExport.csv – make sure you overwrite this file every time you make a new export.
Import into MusicMaster
Before MusicMaster can import the CSV file you created, you must set up the library synchronization definition to MusicMaster. This must only be done once.
The definition is in the file LibSynch_AddUpdate_AsciiD_mAirlist.def which is provided by the MusicMaster or mAirList support. It must be copied into the same location as your MusicMaster database file (.mmd). The definition file must be edited so that it matches the file and field definitions of your particular MusicMaster database. We strongly recommend that you seek for assistance by the MusicMaster support for this (assuming you have a support contract with them).
In particular, you must specify the folder and name of the CSV file that you created with mAirList:
[Import]
SourceType=AsciiD
SourcePath=C:\MM_Sync\Library\
SourceSpec=LibraryExport.csv
The most important thing is to adjust the mapping of the MusicMaster fields (with their numeric IDs) to the column names in the CSV file:
[LibImportMapAdd]
Map1=101,ID,trim(im.currentvalue)
Map2=161,ExternalID,trim(im.currentvalue)
Map3=272,Filename,trim(im.currentvalue)
Map4=103,Title,trim(im.currentvalue)
Map5=105,Title,trim(im.currentvalue)
Map6=102,Artist,trim(im.currentvalue)
Map7=104,Artist,trim(im.currentvalue)
etc.
Note that there are two sections that must be edtied: [LibImportMapAdd] is for adding new songs, and [LibImportMapUpdate] is for the update of existing records.
Once the .def file is correctly set up, you can open MusicMaster, go to Dataset → Library → Synchronize, select mAirList Library Synchronization and run it.
Now all songs from your CSV file should be added to or updated in the MusicMaster database.
Schedule Export (and Import)
This section is about scheduling export, that is, exporting the music log created in MusicMaster and loading it into the mAirListDB playlist view.
We assume that you have used the Automatic Scheduler in MusicMaster to create some music schedules. We use one export file per day, so you should have scheduled at least one entire day that we are now going to export.
The file format being used is mAirList's Text Playlist Import (TPI) Format, essentially a special kind of CSV format (which is good because you can easily open and review the files in any text editor). We use I lines (“Internal ID”) most of the time, so it is important that MusicMaster has the mAirListDB internal IDs stored in one of its fields.
MusicMaster setup
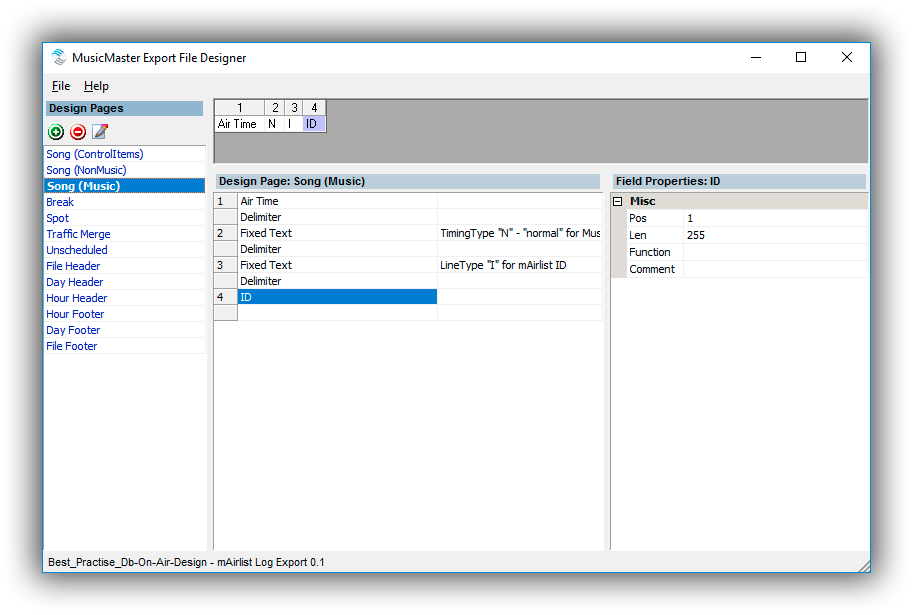
Before you can export the schedule from MusicMaster, you must create an appropriate export definition in the MusicMaster Export File Designer.
Again, we recommend that you let the MusicMaster support assist you in this step. We will provide a template file that will help you to create the definitions quickly.
The crucial part is the 4th column for the three “Song” types (ControlItem, NonMusic, Music), which must use the ID column that contains the mAirListDB internal IDs.
Also make sure that, in the Design Properties, the Output filename pattern must be set to @y1@m1@d1.TPI (= YYYYMMDD.TPI), and the correct folder (C:\MM_Sync\Schedule) is set as the Default output path.
Perform the export
Once the design is ready, save it, then go to Dataset → Schedule → Export → Export to Automation, select the mAirList Log Export format and the desired start/end date, and click OK to start the export. Check the output folder – there should be one TPI file per day, named YYYYMMDD.TPI. When you open them in a text editor, the content should look like this:
00:00:00	N	I	2640
00:03:49	N	I	2634
00:08:47	N	I	2639
00:13:04	N	I	2599
00:18:07	N	I	2642
...
The first column is the start time, the second the timing (“Normal”), the third is the line type (“Internal ID”), and the last column the ID of the scheduled song.
Hint: If the ID column is missing or empty, you have selected an incorrect field for the 4th column in the Export Designer; also check that the ID field has been propagated correctly with the mAirListDB Internal IDs during CSV import.
mAirListDB setup
Now that we have created the TPI files, we can set up the import in mAirListDB, using appropriate hour and music templates. Because even when we use MusicMaster as an external music scheduling software, we will still use the mAirListDB Mini Scheduler in order to import the TPI files into the mAirListDB playlist! We will just advise the Mini Scheduler to pick up the TPI files rather than using the internal music scheduling function. (In fact, you can even combine the internal scheduler and TPI import, e.g. use the hour template to schedule fixed elements like news breaks and advertising, and only use MusicMaster for the music items.)
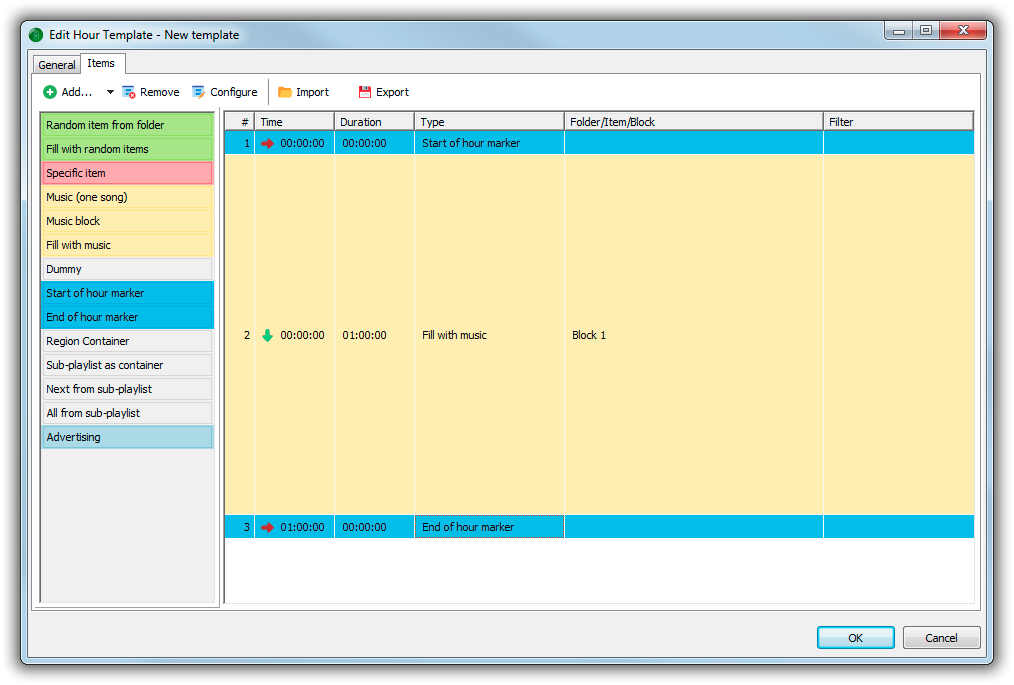
So the first thing to do is to set up one or more Hour Templates in mAirListDB, as described in the mAirListDB Music Scheduling Tutorial. In the most simple case, the hour template will just contain the Start of Hour and End of Hour marker, and then one large Fill with music section in between where content from the TPI file will be inserted:
Note: Use Music block instead of Fill with music in order to import the entire log MusicMaster generated for that hour, including any possible overplanning.
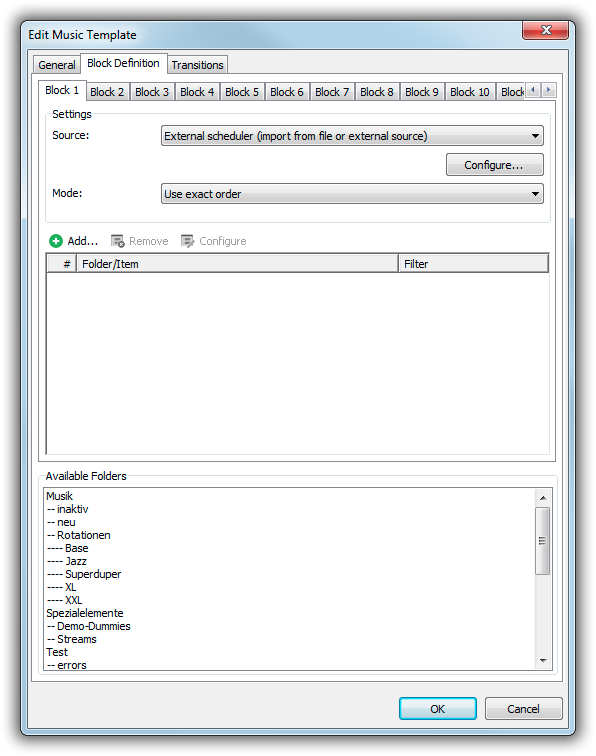
Next, we create a new Music Template. In the definition of Block 1 (we only work with Block 1 all the time), set the source to External scheduler:
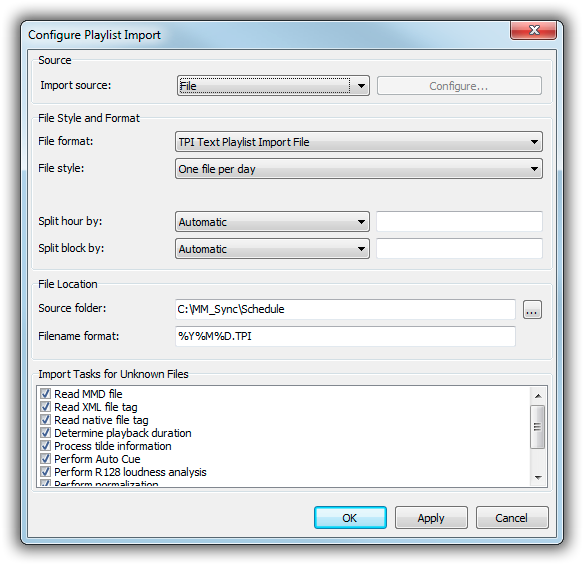
Then click Configure and set up the import file location and format:
The important bits are:
- File format: TPI
- File style: One file per day
- Split hour by: automatic
- Split block by: automatic
- Source folder:
C:\MM_Sync\Schedule - Filename format:
%Y%M%D.TPI
The import tasks can be left untouched as we will not deal with unknown files.
Save the template, and assign it to all 24×7 hours in the Template Assignments grid.
Peform the import
Once the Hour Template and Music Template have been set up, run the Mini Scheduler (click the Generate button in the main toolbar of the Playlist tab). The scheduler will now generate the playlists for the selected hours, picking up the TPI files and using their content for the Fill with music etc. sections.


