Table of Contents
D&R AIRLITE and WEBSTATION Remote Control
This article describes the remote control interface for the D&R AIRLITE-USB and D&R WEBSTATION mixing consoles.
The AIRLITE is an 8-channel 19“ mixer which includes four stereo USB audio interfaces, and a USB control module for fader start etc., all through a single USB connection.
The WEBSTATION is the little brother of the AIRLITE, featuring 6 channels and three USB audio interfaces.
Configuration steps are similar for both models.
Audio Setup
The audio setup is not exactly part of the remote control configuration, actually it's entirely separate, but you will find the following remarks useful.
The AIRLITE has four USB channels/faders, labeled “USB 1” through “USB 4” (WEBSTATION: three USB channels) on the mixer surface. These USB channels all have their own USB (stereo) audio interface, all of which are connected to a common USB hub inside the console.
Also connected to that USB hub is the USB control module used for remote control (see below). So there is a total of five USB devices inside the console.
When you plug the USB cable into your computer, Windows will detect the devices one by one, and give the sound cards names like “USB Audio”, “2-USB Audio”, “3-USB Audio” and “4-USB Audio” (names may vary).
It is important to know that the order of these devices is somewhat random, and it does not coincide with the order of the USB channels on the mixer surface most of the time!
So we recommend that you first go to the Windows audio settings, playback devices, identify each USB channel, then edit each device and change it's name (“Speaker”) to something more useful (e.g. “AIRLITE USB 1”). These names will appear in the mAirList audio setup, so you can easily identify the correct USB audio channel.
Each audio device also has a stereo return signal, represented by a record device in the Windows audio settings. The exact signal mapping can be looked up in the AIRLITE/WEBSTATION manual. The return signal for USB 1 will usually carry the “main” (program) output; use this as the line-in device for streaming.
It is recommended that you use WASAPI instead of DirectSound, as this will avoid mixing up of the several audio devices. Also make sure that you have the console plugged into the same USB port at all times; otherwise Windows may detect all devices as new, breaking your audio setup.
Configuration
The AIRLITE/WEBSTATION software must be installed on your computer before you can start with the remote control configuration.
Then open the standalone configuration app, or the Control Panel, go to the Remote Control page, and add a new D&R AIRLITE or D&R WEBSTATION remote.
We will demonstrate the configuration of the AIRLITE in the remainder of this article; WEBSTATION is similar.
Players
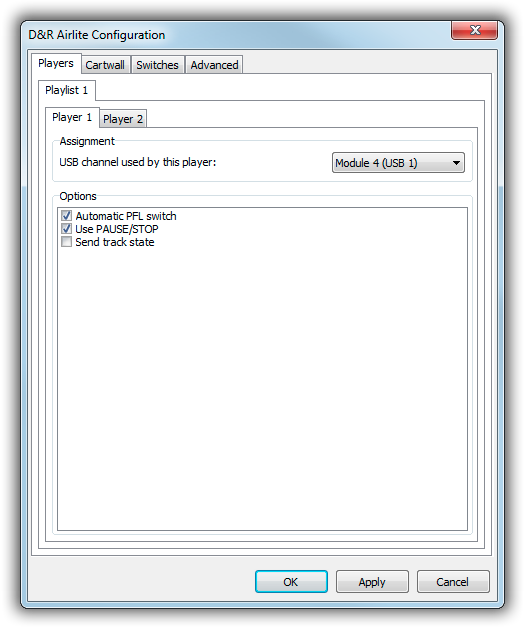
On the Players tab, select the USB channel that corresponds to the respective player:
When you check Automatic PFL switch, mAirList will start the player in PFL mode when you press the PFL key on the console, or switch the channel to PFL on the console when you start PFL in the player with the mouse (or any other remote control mechanism).
The option Use PAUSE/STOP will pause a player first when the fader is closed and no other player is active. Internally, it will use the remote control command PLAYER x-y PAUSE/STOP instead of just PLAYER x-y STOP.
If you want mAirList to send back the state of a particular player (empty, loaded, active, EOF), check the Send track state option. The console will use an active/flashing LED to display the state.
Cartwall
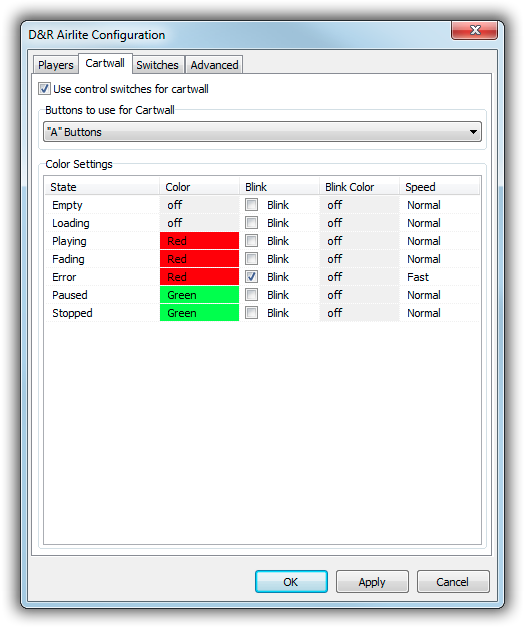
The AIRLITE has 16 buttons (WEBSTATION: 12 buttons), in two rows (labeled “A” and “B”), that can be used to control the cartwall players. If you are going to use these buttons, select the row(s) to use on the Cartwall tab:
You can also customize the way the various states of the cartwall players (empty, playing, etc.) are represented by the color (or flashing) of the associated push button on the console.
Switches
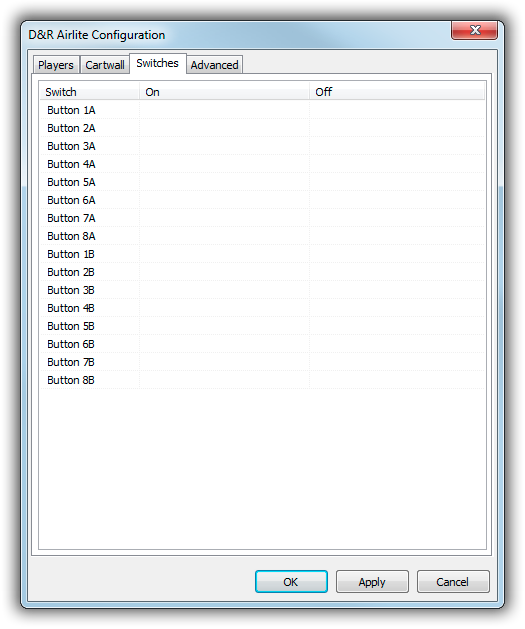
If you are going to use any of the 16 push buttons for any other purpose than the cartwall, you can assign remote control commands to them:
Just select any of the available commands from the dropdown list, or type one manually. The “On” command will be executed when you press the button, the “Off” command will be executed when you release the button.
Advanced
On the Advanced tab, you can adjust the IP and ports that the AIRLITE/WEBSTATION interface software is running on. It is not required to make any changes here unless you are running the AIRLITE/WEBSTATION software on a different computer.
Scripting
The AIRLITE/WEBSTATION remote offers an interface which can be used to communicate with the console from a script. To access the interface, use the following function:
function AirliteRemote(iIndex: integer): IAirliteRemote;
Note: Name of the function is always AirliteRemote, and name of the interface is always IAirliteRemote, also for WEBSTATION. (The same class is used used internally for both models.)
Remotes are 0-based, so AirliteRemote(0) will return a reference to the first remote in the system.
Up to mAirList 6.2, the IAirliteRemote interface offers two useful functions:
procedure SetLED(iNumber: integer; iColor: TAirliteColor);
procedure SetLEDBlink(iNumber: integer; iOnColor, iOffColor: TAirliteColor; iSpeed: TAirliteBlinkSpeed);
The first one sets an LED of one of the push buttons to a particular color, the second one does the same, but with flashing. The available button IDs for AIRLITE are:
- “A” buttons: 0 (Button 1A) to 7 (Button 8A)
- “B” buttons: 8 (Button 1B) to 15 (Button 8B)
- 255 (hex
$FF): All buttons at the same time
And for WEBSTATION, given the lower number of butttons:
- “A” buttons: 0 (Button 1A) to 5 (Button 6A)
- “B” buttons: 6 (Button 1B) to 11 (Button 6B)
- 255 (hex
$FF): All buttons at the same time
The available color values are:
alcNone(no color, LED off)alcRedalcGreen
The available blink speed values are:
albsSlowalbsNormalalbsFast
Starting with mAirList 6.3, access to the following low level remote functions is possible through the IAirliteRemote interface:
function RemoteOn(iModule: TAirliteModuleType; iAction: TAirliteAction): integer;
function RemoteCue(iCueType: TAirliteCueType; iAction: TAirliteAction): integer;
function RemoteCueReset: integer;
function RemoteAutoCueAnnouncer(iAction: TAirliteAction): integer;
function RemoteAutoCueCRM(iAction: TAirliteAction): integer;
function RemoteNonStop(iAction: TAirliteAction): integer;
function RemoteComm(iModule: TAirliteModuleType; iAction: TAirliteAction): integer;
function RemoteCough(iModule: TAirliteModuleType; iAction: TAirliteAction): integer;
function RemoteVT(iModule: TAirliteModuleType; iAction: TAirliteAction): integer;
Possible values for TAirliteModuleTypes are:
almModule1almModule2almModule3almModule4almModule5almModule6almModule7almModule8almModuleAll
Possible values for TAirliteCueType are:
actModule1actModule2actModule3actModule4actModule5actModule6actModule7actModule8actAuxactNonStopactAiractAll
Possible values for TAirliteAction are:
alaDeactivatealaActivatealaToggle
Example
Switch on Cue over AIR input when Extra-PFL is launched:
procedure OnExtPFLOn(Item: IPlaylistItem; ExtPFLCount: integer);
begin
  if ExtPFLCount <> 0 then
    AirliteRemote(0).RemoteCue(actAir, alaActivate);
end;
… and turn off when Extra-PFL is closed:
procedure OnExtPFLOff(Item: IPlaylistItem; ExtPFLCount: integer);
begin
  if ExtPFLCount = 0 then
    AirliteRemote(0).RemoteCue(actAir, alaDeactivate);
end;


